Monday 30 September 2013

Painting WW2 Soviets - the 'dip'

TIP: I have found that a box of cheap 'disposable' latex gloves is very handy for this next step.. avoids much sticky messy cursing later.


The Army Painter 'dip' is now applied to the figures which have been given a basic coat of colours (last blog post). The first time I used this stuff, I actually 'dipped' the figures.. gripped the base with a pair of old pliers, dipped the figure head first into the tin and flicked and shook it to get the excess off. It probably works for some applications, but I prefer to brush it on now.

Using the 'Strong Tone' dip and an old brush that I keep for the job, a pretty liberal splash of the dip is applied to each figure in turn. I work in batches of around a dozen, allowing the dip to settle and gravity do some work, before going over each figure in turn with a smaller, dry brush (again one I keep specifically for this job) to 'pull' off any nasty pools of dip that are forming. With these figures, I find that the 'apron', the lower front part of the tunic is an area to pay attention to. I'm not overly fastidious about this part of the process.. overall consistency is the key for me here.


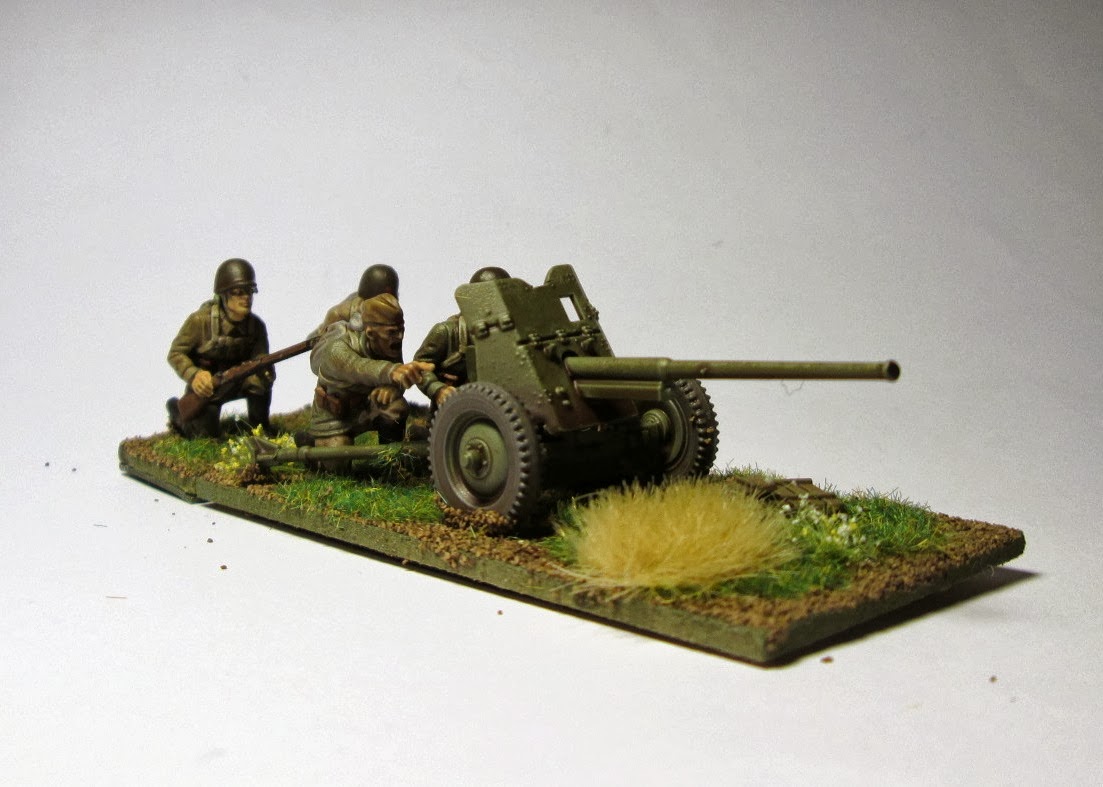
At this point the figures have gone from pale and slightly crappy-looking, to shiny and messy looking! But I have faith.. now going to let the dip dry for at least 24 hours before the next stage.

Sunday 29 September 2013

Painting WW2 Soviets - basic colours

Having assembled and based the Warlord plastic Soviets, they were sprayed with Army Painter Dark Green (see last blog post)

The next step is to 'colour in' - choosing the basic colours required (I go for slightly lighter shades that I want to end up with) and blocking in all the relevant areas as neatly as I can. Yesterday I managed to get this next stage completed for around 20 figures.

At this point they look pretty awful and it's so tempting to get shading and highlighting.. but I have faith that the dip will transform them.


Basically I've used a limited palette of Vallejo Khaki and Coat d'Arms Tan Earth and Roan, along with the undercoat green, as the main uniform colours. These have been applied fairy randomly across the tunics and trousers, but as there are only these 4 main colours, (mostly the first three), there is a sense of uniformity across the units.

Helmets have all been painted Olive, and then all the strapping and equipment given random attention too - mostly using Vallejo Stone Grey and Coat d'arms Wood Brown.

I know the guns shouldn't be shiny - a black or dark gunmetal grey would be more accurate - but using a chainmail to highlight the black undercoated metalwork helps them to stand out.

Next time - the messy bit, slapping on the 'dip' :-)


Saturday 21 September 2013

Bolt Action Russians

I mentioned before that I really quite like the Warlord plastic 28mm WW2 Soviet infantry. I have already painted up a small force, but recently picked up some reinforcements - basically another box. 

It occurred to me to paint these 'online' - show progress on this blog.

This isn't because I want to show off my painting skills.. rather to show how effective some very simple techniques can be. It's certainly not everyone's cup of tea, but I am using the 'Army Painter' methods to paint these. Undercoat, block colours, brushed on 'dip' and matt varnish. really quick. For me it's about getting the figures painted to a good standard and on the table as soon as possible. (I can't play with unpainted figures.. just can't do it!). The figures don't actually look as dark as they do in these pictures. I need to sort out my lighting.

So.. I've already assembled a couple of sections and some extra figures which I intend to use as Artillery observers. I used the Army Painter green spray to undercoat. (I normally use Auto primers or Plasticote and I reckon that the Army Painter sprays are better - certainly seem to cover well and have fast drying times).

Some pictures..
A finished LMG.. and a newly undercoated figure

Army Painter Green undercoat.. they look like 'Army Men'


A Zis3 gun.. made by the Plastic Model Soldier company

Some SMG infantry

Sniper

Sniper

Anti Tank Rifle

Anti Tank Rifle 
Spotter

Friday 20 September 2013

From Afghanistan to Denmark?

I've had a hankering to collect and game around the 1848 Schleswig Holstein War for a while. I've always been drawn to the European mid 19th Century conflicts.. maybe just because they are a little different from the wargames norm. Also - I have some 'blood' in that area.. it's where my ancestors on my mother's side come from.. NordFriesland.

Anyway - I reckon 28mm is likely to be rather expensive way of scratching that itch and I found that Pendraken to a range in 10mm for this particular conflict. I've played with 15mm figures before, (still have boxes full of unpainted) but no experience of these. 

I was thinking of ordering a couple of packs, just to paint up and see how I get on with them , when I remembered a show purchase from many years ago. I have a North West Frontier 'Army Pack' which has been lurking in my drawer for ages. So,  I've rummaged through and picked out 24 British regulars from this pack to use as a test unit. I know it will be khakis rather than reds and blues, but hopefully will give me some feel for painting and basing these little fellas.

Step One - stuck on coffee stirrers. next up, black undercoat.


Black undercoat done.. I was tempted to drybrush these in khaki, then pick out 'details' . However, it can look a bit rough, so I resisted the temptation and blocked in the colours instead, leaving a fair bit of black showing as 'shadows';


1. Flesh - Vallejo Flat Flesh
2. Uniforms - Vallejo Iraqi Sand
3. Rifles - Coat d'Arms Wood Brown
4. Puttees - Vallejo Khaki
5. Straps and kit - Coat d'Arms White
6. Some kit - Vallejo Flat Earth

Finally I gave the figures a dilute wash of Games Workshop (Citadel) 'Gryphone Sepia'. I have no idea of GW still make this, as I'm not a regular customer, but it's a really useful wash, especially for whites and pale colours.


So, overall from gaming distance (ie a couple of feet away).. I think these look okay. (The pictures aren't great but there is no daylight at the moment). Took me about an hour or so to paint the whole unit and once based up, they should be fine. 


It's certainly given me encouragement to look at the ranges for the Schleswig Holstein war.

Now.. do I paint the rest of the pack? (including hordes of Pathan?)

Thursday 19 September 2013

The Empire Struck back!

Enjoyed a couple of games of X-Wing with Scrivs the other night.  You can see pictures over on his blog.

We played a couple of missions from the rules in the basic starter set. We have found that the missions can play very differently each time you try them.. I was controlling Tie fighters and the 'Dark Whispers' mission seemed almost impossible to complete on the first run, but on our second playing was a complete Imperial victory.

This is quite a fun diversion of a game, and although the miniatures might appear to be a little pricey, they are very well made, detailed and decorated.

See Geek and Sundry for an entertaining play-through on You Toob.

Tonight had my first game of Pulp Alley with James.. there was quite a bit of reading as it was my first run through, but thoroughly enjoyed it, even though TinTin didn't get his man this time. There will definitely be more Pulp to follow..

Saturday 14 September 2013

Arthur re-based again

Some years ago I finished reading the Cornwell Arthur books, just as Gripping Beast put out their pretty special Arthurian ranges. I assembled a couple of small WAB armies, based around Romano British and the GB German Tribes warbands.
I used the 'Fall of the West' WAB book - probably still my favourite. When James Morris' excellent Arthur supplement came out, reading of the Saxon bucklers etc, I found that my armies seemed rather anochronistic.. the Romano British and the later Saxons.. one side needed to move back or forward a hundred years or so.
Anyway. I only played a few games of WAB. Some time later, I decided to try out some other rules.. perhaps Neil Thomas Ancient and Medieval Wargames, or Impetus.. I re-based the whole lot onto unit-sized bases. I loved the look of this, being able to organise the units into little dioramas, huddled together in a shieldwall. For one reason or another though, I didn't really take to the rules for this period and I took a breath and rebased the whole lot again for WAB.

And then put them away.

Fast forward a year or so, I'm re-discovering wargames and I buy Dux Bellorum. The group I meet with also play Hail Caesar (I haven't tried it yet)..I recently resolved to get this lot rebased again.. back to the unit sized bases. As I got them out on the table, I despaired at the thought of tearing the figures off the bases again, and the resultant inevitable breakages and damage. However, with a bit of fiddling about, I've managed to avoid doing that altogether.


What I have done is to stick the WAB- based figures directly onto 120mm x 60mm unit bases. I've used dice frames from minibits on the rear of each base. This will be for recording hits etc in either Dux Bellorum or Hail Caesar. There are a few gaps here and there, but a bit of filler and scenic material will sort that out.


The cavalry units are on two bases for depth. I'm still unsure how to base the skirmishing types, but for now, I'm happy that I can soon once again use these much-loved figures. (Will probably be one army rather than a 'matched pair')

Wednesday 11 September 2013

A game of two halves

Last night Fred (Mog junior) and I had a game of Bolt Action. It is very much our joint game of choice of late. 

We had forces of around 790 points for this game - Russian and German, both based on the 1944 lists found in the respective army books.

Figures are nearly all Warlord and mostly plastic. I really like the Russians in particular, I'll post more on them soon. 

Scenery is a little makeshift, but I recently scratch-built the buildings and the fields and this was their first outing.

We played the 'Point Defence' scenario. Russians (Fred) opted to defend. His force consisted of;

HQ - Regular 2nd Lt
One Inexperienced Rifle section (Green)
One Regular LMG section (an infantry team with 2 LMGs)
One Regular SMG section
Supports came in the form of a Mortar, MMG, a sniper and a T34/85. Off table in reserve was an AntiTank Rifle team.

In attack, the Germans fielded;

HQ - Regular 2nd Lt with two men
Artillery Forward observer (two men)
One infantry section with Hanomag - Regular Heer
One infantry section 'zu fuss'
Supported by MMG, Med Mortar team and a STUGIII held in reserve.

The game started off fairly well for the Germans (me). The preparatory artillery bombardment put some pin markers on most teams and wiped out the HQ straight away. Then in the first few turns, a confident advance and fairly effective fire took care of the Green rifle section. On the Russian right, FOO directed artillery fire took out their mortar team, but the SMG section bravely moved forward, avoiding most of the barrage.

By the end of turn 3, Fred had started to lose faith and I could tell he was feeling that he'd lost already. Some fatherly advice about not giving up was about to prove right, although I'm not sure that being able to say 'I told you so' was much comfort!

The Russians finally managed to get the LMG team moving (they had been struggling to shake of the effects of the initial artillery bombardment), and some very effective fire cleared the woods of the Heer section in front of them.  The sniper on the hill also found his aim, crippling the MMG team which had so far done very little in the fields in front of the Russian left.


With slow progress being made on the German left, and no hope of capturing the central objective, much hinged upon the arrival and effectiveness of the Stug. Finally on turn 5, the Stug arrived - perfectly positioned at the foot of the hill behind the sniper. At this point, the T34 which had been on 'Ambush' orders, turned his turret and fired off one perfect shot, hitting and destroying the German armour before it could do anything.

An enjoyable battle which definitely illustrated how fates can turn within a game. Things to look up - transports. I need to understand how to better use the Hanomag. At the moment it's an expensive bus.


New Blog..what's this about?

What's this about?

Having re-connected with my first hobby, it seems only natural to 'blog it' .. I've been keeping webpages and a blog for a few years, focussing on model railways and my pootlings in that field. (Still have plans to build an HO layout.. and a 3mm one.. but that's for Mogtrains)

I was a wargamer. And then I was a person with an interest in wargames, mostly actually playing solo games.. and now I'm a wargamer again. The hobby has changed and moved on since I was last more active.. DBM and 15mm ruled the tables, now it's all 28mm plastic armies and big hardback rulebooks with simple fun mechanics. All good. I've dived right in and been mostly playing Bolt Action , Saga and Black Powder.. more of that later.

I'm not too sure of the purpose of a blog.. whether it's to entertain, educate, record, or just be a good source of incentive for the blogger to do interesting stuff. Maybe it's all of these and more.. or less..

Anyway. I will hopefully be posting fairly regularly. I'm not entirely sure at the moment what direction we'll be going.. but there will be pictures of painted (or not) wargames figures.. battle reports, reviews/thoughts on wargames products, scenery making.. that kind of stuff. Hopefully it will of some interest to someone :-)